Take it easy, sit back and relax
About two years ago, I wrote a Basic Minecraft Multiplayer and Server Hosting Tutorial. At the end, I mentioned that I would write an advanced tutorial later. Today I'm finally filling in that gap.
As server owners know, if you don't want to enable official authentication for your server - for example, a casual server for friends in a chat group - but you're worried about players being impersonated and having their items stolen, what can you do?
Veteran players should be familiar with the image below. Back in the day, basically 90% of offline third-party servers used this authentication plugin. Commands like /login and /reg all come from this plugin.

This plugin is AuthMe, and many servers still use it today. However, I find this plugin inelegant. I prefer the official authentication experience - logging into your account in PCL and launching the game to directly join the server, with saved credentials so you don't have to enter your password every time you join. (I'm currently playing on a server where 95% of players have legitimate accounts, but they installed AuthMe for that small group of offline players, seriously degrading the experience for legitimate players.)
Blessing Skin Server is an open-source skin server project on GitHub. Its primary function is as a skin server, but with some plugins, it can achieve a simple "authentication server" effect. It provides a one-stop service for player self-registration, skin management, launcher login, and server-side verification. Additionally, if you self-host Blessing Skin Server, server owners can manage their servers extremely efficiently. After all, skin server = authenticator. If a player misbehaves, you can take action directly from the skin server without touching the whitelist on the MC server. If multiple people need to manage server personnel, you can also handle it through the skin server by granting admin permissions. I've been running servers for nearly 10 years and haven't seen a better player management solution than a skin server.
Currently, there are two ways to use Blessing Skin Server: use an existing one, such as the well-known LittleSkin, or self-host. Let me introduce the existing option first.
This cannot replace official authentication
It cannot help you join servers that only support official authentication
Please support official Minecraft when possible
This tutorial only covers the setup and integration of LittleSkin and self-hosted skin servers
LittleSkin
This is currently the largest Blessing Skin server with a massive user base, which means it has the most comprehensive shared skin library in China. It's also very popular, so you can find almost all the latest and hottest skin resources.
It's very simple to use. Go to LittleSkin to register an account. The integration instructions are divided into player side and server owner side below.
Player Side
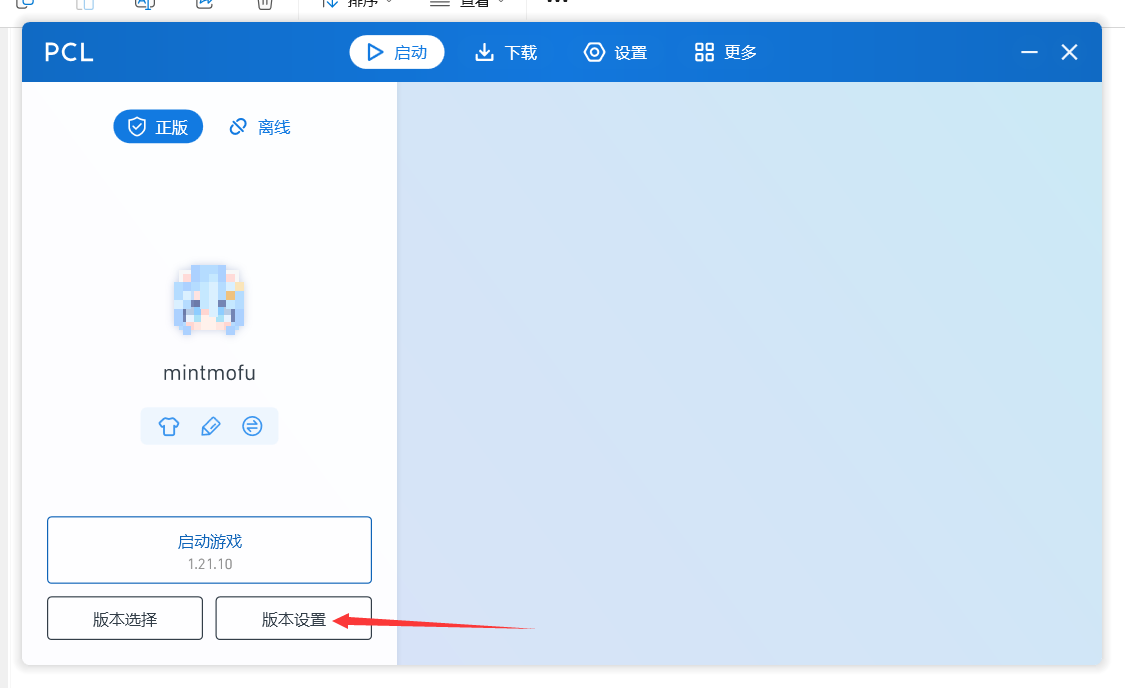
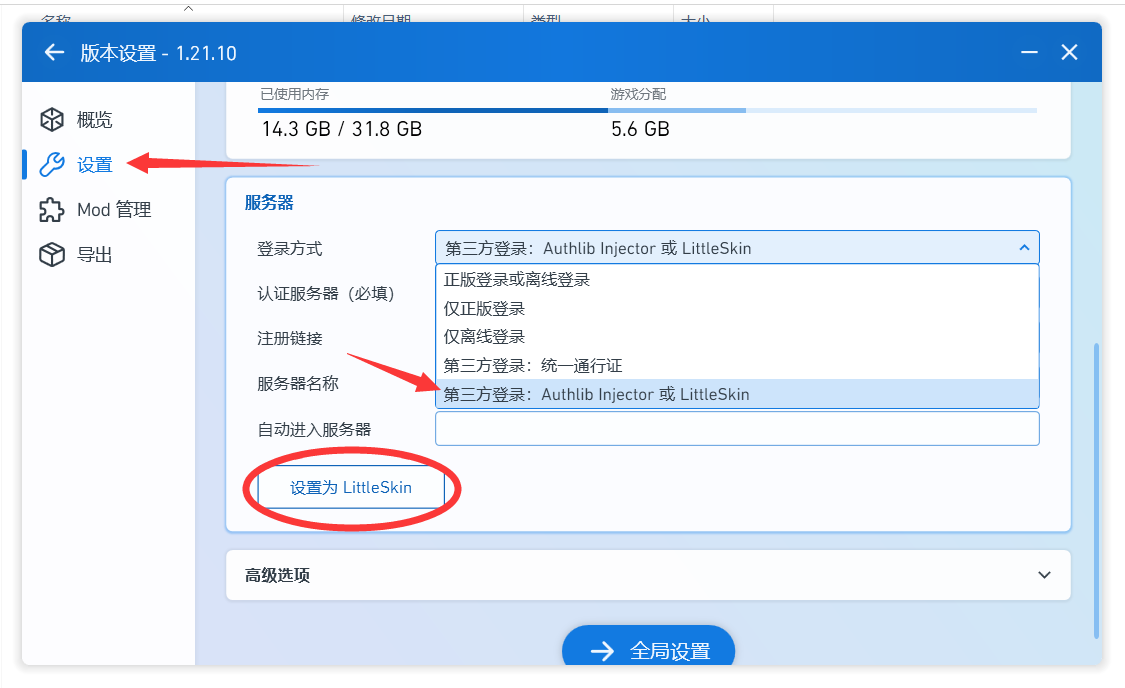
PCL
If you use PCL, it's very simple. Go to Version Settings → Settings → Server and set Login Method to Third-party Login: Authlib Injector or LittleSkin. Below that, you'll see a Set to LittleSkin button.
If you have an older version without this button, just enter the following address in the authentication server field.
Then return to the game launch screen, enter your account credentials, and launch the game.
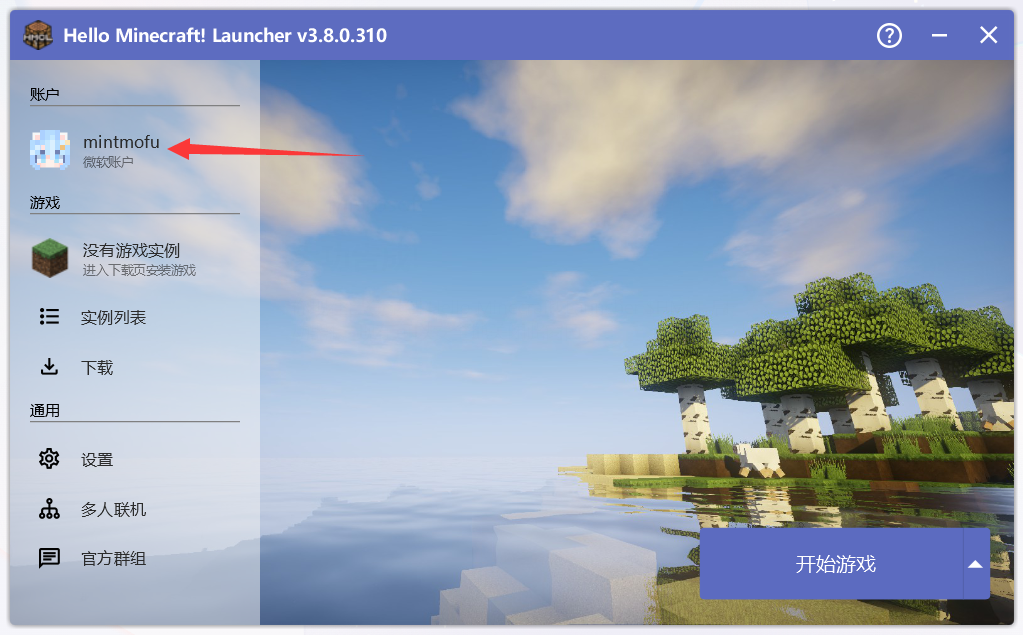
HMCL
If you use HMCL, it's also very simple (these Chinese launchers are really thoughtful). In the account section, click on the avatar. LittleSkin is already built into the add account menu - just enter your credentials.

If you have an older version without this button, just add an authentication server and enter the following address.(To write this tutorial, I had to scroll through over ten pages of GitHub Releases to find this version.)
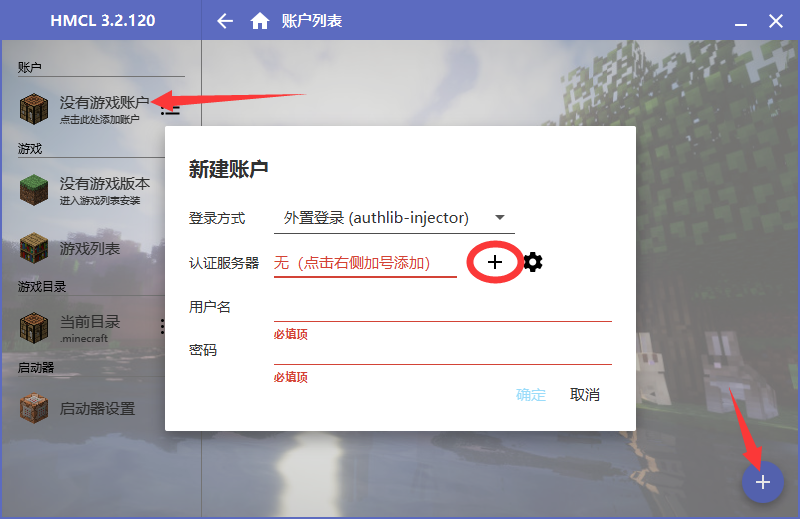
Then enter your credentials and you can launch the game.
Server Owner Side
Server owners should understand why to use a public skin server. A public skin server is a good alternative to official authentication. However, in terms of management, it's slightly inferior to self-hosting because you don't have access to the player backend - it's essentially just an enhanced AuthMe. Server owners with the capability are recommended to self-host a skin server.
Assuming you've already set up your server:
Download authlib-injector and place it in the server root directory.
Download links: GitHub Releases, 123Pan
First, enable official authentication on the server by setting online-mode to true in server.properties.
Then add the following to your startup command. The version number must match your server version.
Example:
That's it - you can now start the server.
Players who are not logged in through the skin server will be unable to join the server, with the following error messages:
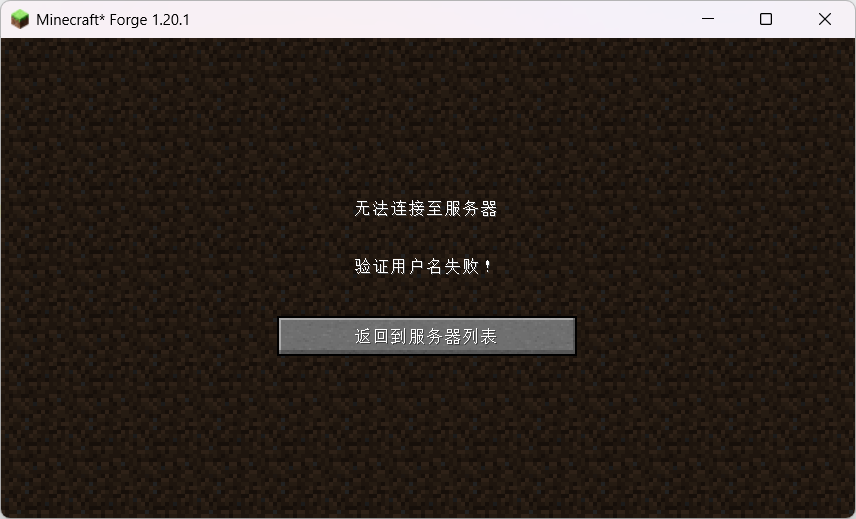
Official Login & Other Third-party Authentication
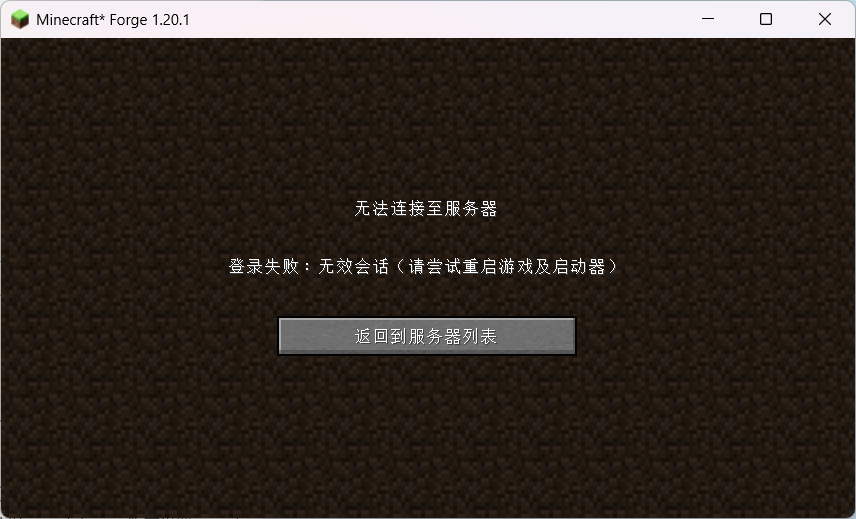
Offline Login
The whitelist mechanism works the same as official authentication - you can directly add LittleSkin character names.
Self-hosting Blessing Skin Server
This is the main event and my personal choice. The benefits of self-hosting are:
- Player management (easily manage player skins and characters
ban whoever doesn't behave) - Invitation code registration (Whitelist PLUS!)
- Multi-user management (you can assign trusted people to manage the skin server players)
- Upload textures freely
The most important benefit is that this is a system in your own hands with very high flexibility.
1Panel Setup
I'll assume you've already installed OpenResty and MySQL (if not, don't worry - installing these two doesn't require any special parameters, just install the latest versions).
Go to Website → Runtime Environment to create a PHP runtime environment.
Customize the name and container name, select PHP 8 for the application, choose 8.1.33 for the PHP version, and leave the rest as default.
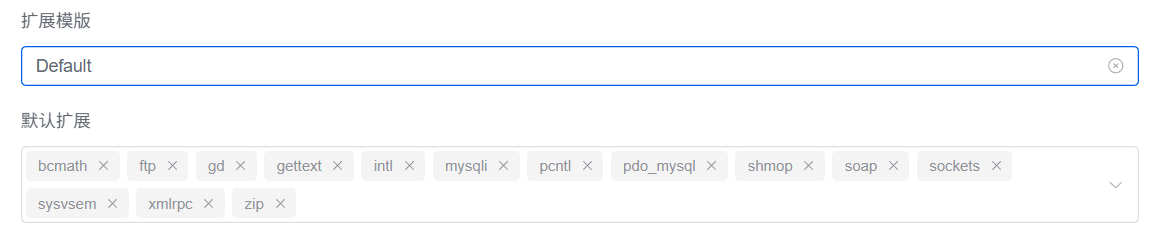
The most important step! Select Default for the extension template, and it will automatically fill in the required extensions.
Click confirm and wait for the image to be built, then you can create the site.
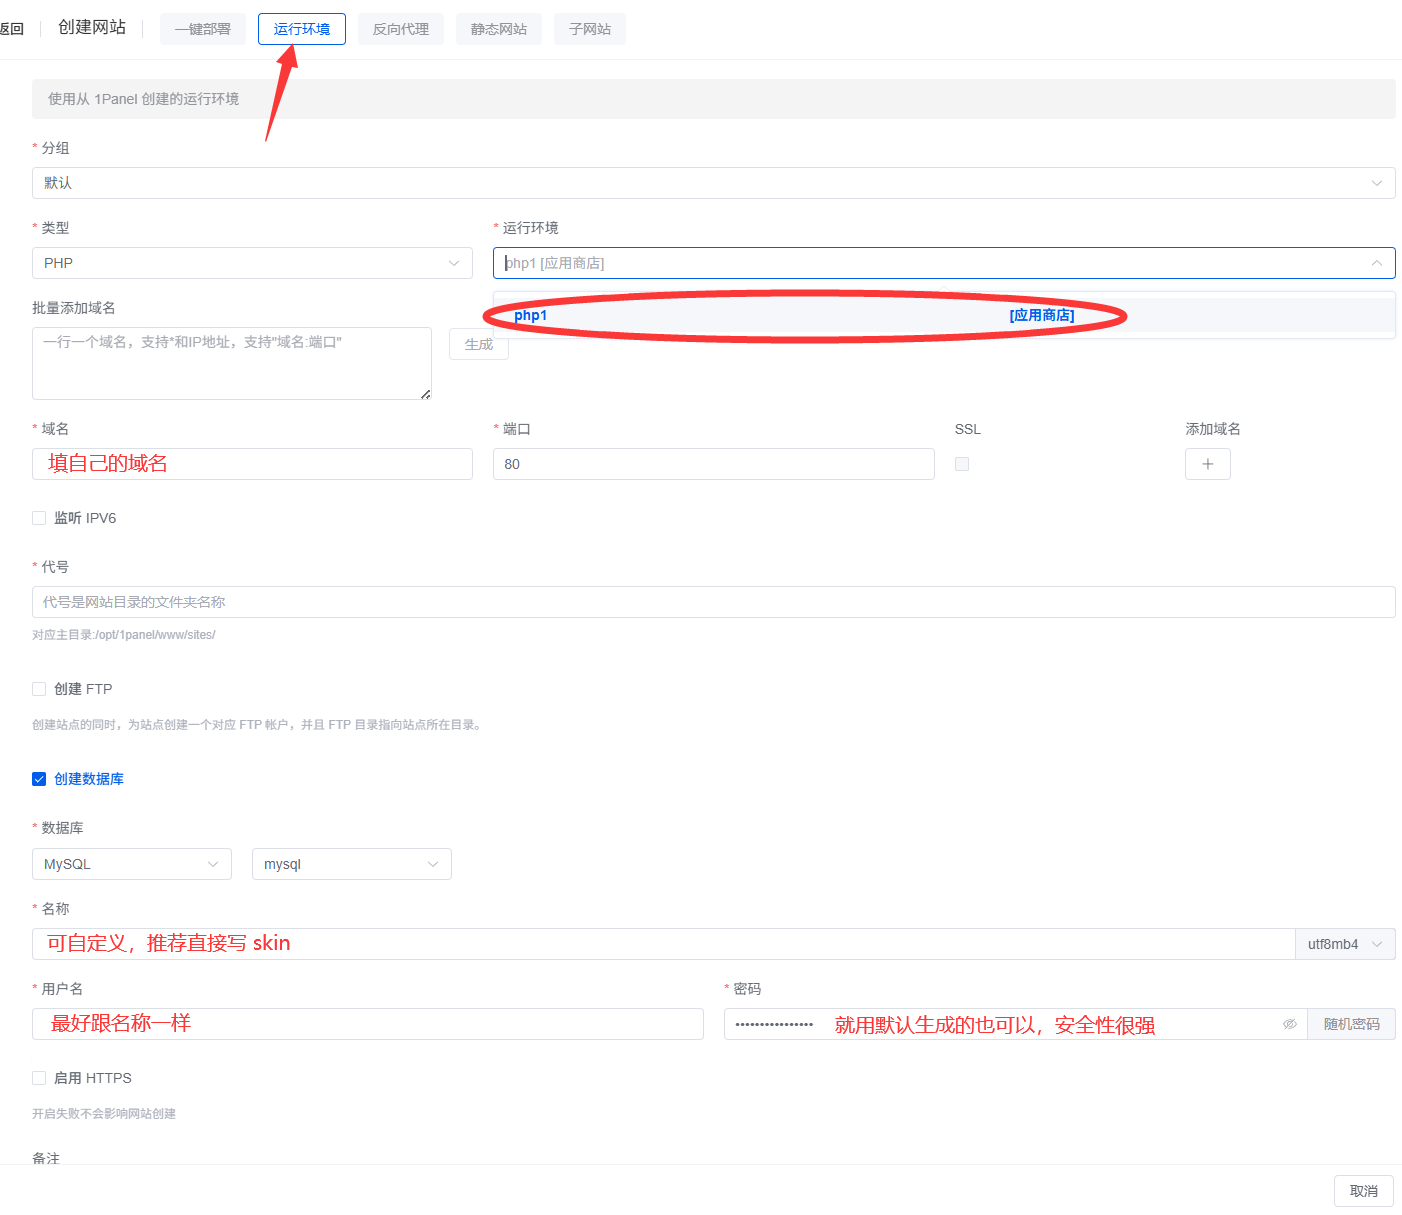
Return to the website page to create a website. Select Runtime Environment at the top, choose PHP for type, fill in the runtime environment you just created, and enter your own Domain.
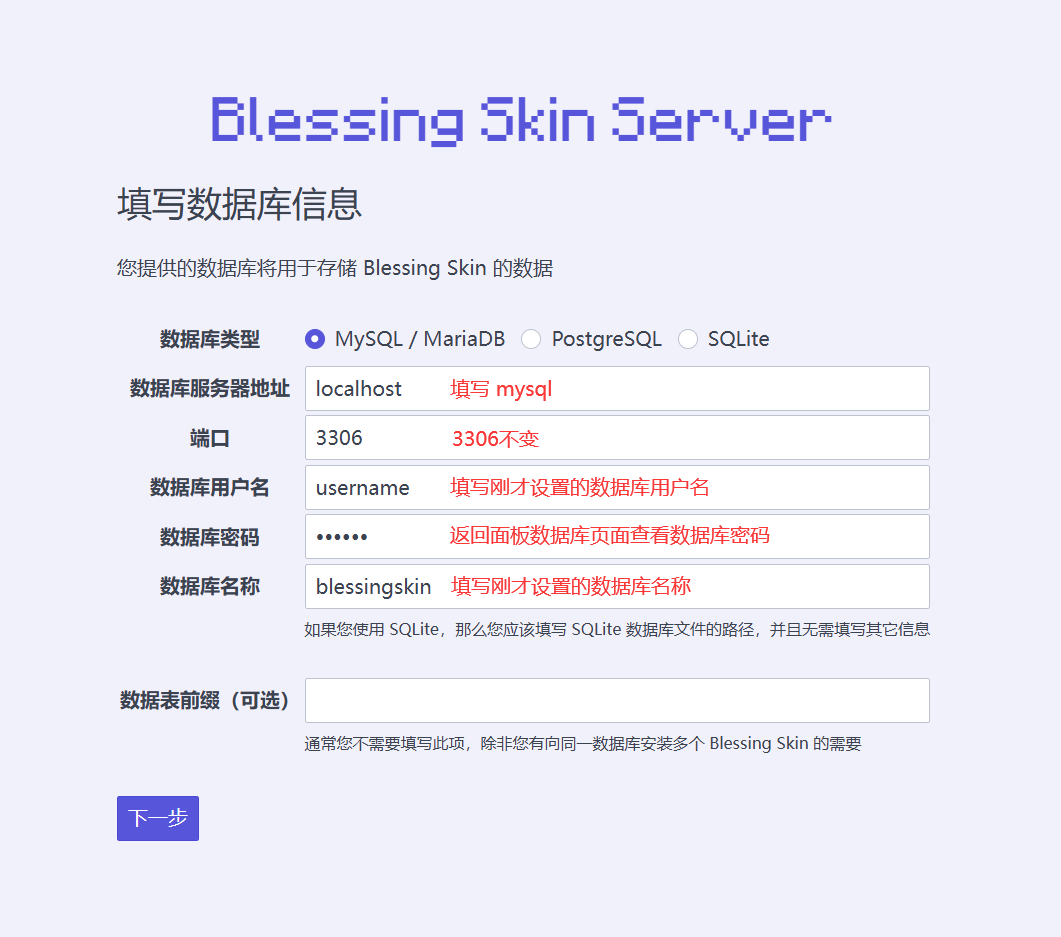
It's recommended to create the database at the same time. You can customize the Name and Username, and it's recommended to keep the default Password.
(If you don't understand, just follow the image.)
Download blessing-skin-server, extract it, and place it in the website directory.
Download links: GitHub Releases, 123Pan
On the website configuration page, set the running directory to /public and save. Set both the running user/group permissions to 1000 and save. On the Pseudo-static page, enter the following code and save:
Now you can directly visit the website to fill in the information.
Enter mysql for the server address, keep the port unchanged, enter the database username and name you created earlier. You can check the password on the database page.
Then fill in the super admin email, nickname, password, site name, etc. as you see fit.
Installation is complete! You can skip to the optimization section.
aaPanel Setup
I'll also assume you've already installed Nginx and MySQL (if not, don't worry - installing these two doesn't require any special parameters, just install the latest versions).
Go to App Store and install PHP 8.1.
After installation, configure PHP 8.1 and install the following extensions in Install Extensions:
- OpenSSL >= 1.1.1 (TLS 1.3)
- PDO
- Mbstring
- Tokenizer
- GD
- XML
- Ctype
- JSON
- fileinfo
- zip
My current aaPanel version is
v11.3.0. Except for fileinfo which needs manual installation, all other extensions are pre-installed by default.After installing the extensions, go to Disabled Functions and disable the following functions:
- symlink
- readlink
- putenv
- realpath
My current aaPanel version is
v11.3.0. Except for realpath which is not disabled, all other functions are disabled by default. Just remove them from the disabled list.Now you can return to the Website page and add a site.
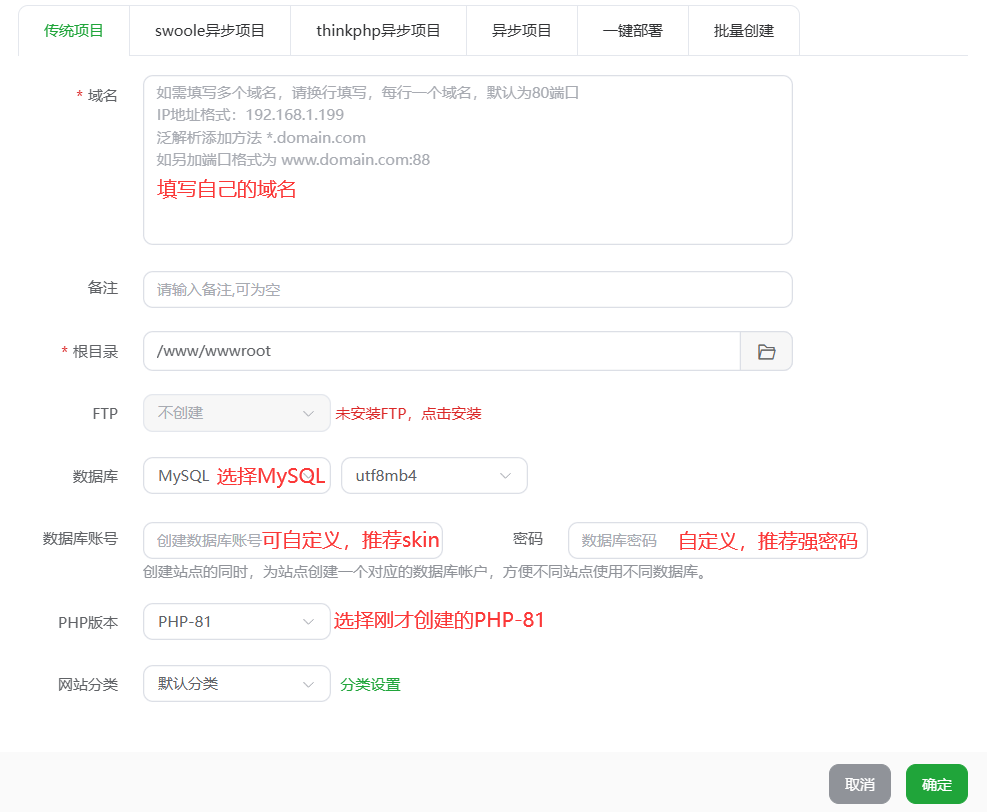
Enter your own domain for the domain name, select MySQL for the database, customize the database username and password, and select the PHP-81 you just configured.
(If you don't understand, just follow the image.)
Download blessing-skin-server, extract it, and place it in the website directory.
Download links: GitHub Releases, 123Pan
Enter the website settings panel and switch to the Site Directory page. Change the running directory to /public, uncheck the Anti-cross-site Attack option, and click save.
Then switch to the Pseudo-static page, enter the following code, and save:
Now you can directly visit the website to fill in the information.
Keep the default server address and port (address localhost, port 3306). You can check the database username, password, and name on the aaPanel database page. I won't include screenshots here.
Then fill in the super admin email, nickname, password, site name, etc. as you see fit. Once completed, the installation is successful.
Optimizing the Skin Server
Fixing the Plugin Market
After installation, you'll see this error when entering the plugin market:
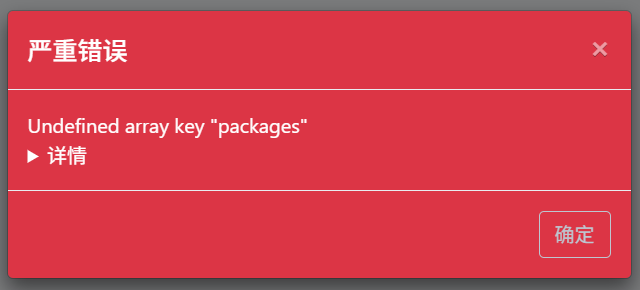
This is normal. We just need to add a line of code to the .env file in the website root directory to load it properly.
Configuring the Email Server
Similarly, configure this in the .env file.
Just change the corresponding parameters to your own.
Yggdrasil API
This is the key point! The skin server's login verification depends entirely on it.
Yggdrasil API + authlib-injector = ✨
The specific verification process is as follows (official authentication actually uses the same principle):
Go to the plugin market, find Yggdrasil API, download it, and then enable it in the Plugin Management menu.
Then go to the Yggdrasil API submenu under Plugin Configuration and modify as needed.
Return to the user center dashboard and you'll see a Quick Launcher Configuration card. Drag the Drag this button to launcher button to your launcher to quickly configure third-party login.
Player Integration
Compared to self-hosting, it's incredibly simple - many steps are just "drag this button to launcher".
I'm too lazy to take screenshots. If you want to see images, just refer to the LittleSkin integration method above - just replace the authentication server with your own address.
PCL
"Drag this button to launcher"
(Manual configuration)
Very simple. Go to Version Settings → Settings → Server and set Login Method to Third-party Login: Authlib Injector or LittleSkin.
Enter the address from your skin server's Quick Launcher Configuration card in the authentication server field.
HMCL
"Drag this button to launcher"
(Manual configuration)
In the account section, click on the avatar, then Add Authentication Server below Add Account. Enter the address from your skin server's Quick Launcher Configuration card.
Don't forget to click on the server and enter your credentials after adding it.
Server Owner Integration
Assuming you've already set up your server:
Download authlib-injector and place it in the server root directory.
Download links: GitHub Releases, 123Pan
First, enable official authentication on the server by setting online-mode to true in server.properties.
Then add the following to your startup command. The version number must match your server version.
Example:
That's it - you can now start the server.
Players who are not logged in through the skin server will be unable to join the server, with the following error messages:
Official Login & Other Third-party Authentication
Offline Login
Whitelist PLUS Approach
It's actually very simple. Since the server now only recognizes skin server logins, you just need to install the Registration Invitation Code and Single Character Limit plugins to achieve this.
Distribute registration invitation codes one-on-one through chat apps like QQ. Use the single character limit to prevent one user from registering multiple characters to share accounts.
The admin or server owner distributing invitation codes can also track who gave which invitation code to whom through a spreadsheet. Whoever causes trouble gets banned, and everything can be traced back to their QQ account. You can even clearly see which UID used which invitation code. Check the backend - corresponding email, in-game ID, plus the tracking spreadsheet - all information is crystal clear.
||Don't ask me why I know this so well - I've done exactly this with my own server.||
Explore the backend yourself and you'll find it's very versatile, with everything clearly visible. This is why I strongly recommend self-hosting for server owners who have the capability.