Comprehensive Step-by-Step Tutorial for Frp 0.52 and Above (Including Setup and Usage of frps and frpc)
(已编辑)
/ , , , ,
2321
1
AI Translation中文 → English
This article has been automatically translated by AI and may contain inaccuracies
This article was last modified on . Some content may be outdated. Feel free to ask the author if you have questions.
Comprehensive Step-by-Step Tutorial for Frp 0.52 and Above (Including Setup and Usage of frps and frpc)
Loading...
Loading...
Loading...
Loading...
Loading...
In today's environment, not every household has a residential public IPv4 address, but everyone wants to set up a website to play around with. Or perhaps you're fed up with the pricing methods and tactics of major cloud storage providers and want to set up a private cloud to meet your demanding storage needs. Although there are solutions like IPv6, they are limited by router firewall issues and the adoption rate of IPv6 in China. Currently, IPv6 in China is more like a supplementary solution to IPv4, rather than a true replacement. (After all, I've never heard of a pure IPv6 website)
This is when we need to use intranet penetration software like Frp to achieve external network access without a public IPv4 address.
(This article does not cover the installation of the corresponding systems, only the setup and usage of frpc and frps)
(The frps/frpc version demonstrated in this article is 0.53.0 (a major version update came out while I was halfway through writing this article...), significant version differences may cause connection failures and other bugs)
First, let's understand what Frp can be used for and where it can be applied. (The following only lists some common scenarios)
Home use: File sharing, remote monitoring, remote private cloud, etc.
Gaming: Minecraft multiplayer/servers, Terraria multiplayer/servers, and other games that can be opened to LAN for multiplayer
Website building: Personal homepage setup, blog setup, reverse proxy, etc.
Professional use: RDP/SSH remote connection, Docker external access, etc.
frps is the server, frpc is the client
Now that we understand what Frp can do, let's get started with the hands-on work!
1. Setup and Configuration of frps
1-1. Introduction to Common frps Configuration Files
Since frp version 0.52.0, TOML, YAML, and JSON configuration files are supported, and INI configuration files have been deprecated. Support for INI will be removed in future versions. GitHub Announcement
Therefore, tutorials for versions before 0.52.0 on the internet may become obsolete in the future (if you're using an old version, just ignore this)
For stability and new features, all frps/frpc examples in this article will use TOML configuration files
frps is a lightweight reverse proxy client that can achieve intranet penetration functionality. frps needs to be used together with the frpc client. frps needs to be deployed on a machine with a public IP, and frpc is deployed on the machine where the intranet service that needs to be penetrated is located.
Server connection port (required)
Server authentication and password (optional, recommended)
(For OIDC authentication, refer to the gofrp documentation. We'll only cover the most commonly used token here)
Server TLS connection encryption (optional)
Server Web interface (optional)
(If WebSSL is not configured, the webpage will be presented via http)
Server HTTP(s) listening port (optional)
(Usually 80 and 443, if they're occupied by nginx or something else, you'll have to use different ports)
Server port restrictions (optional)
Server connection limit (optional)
For more common configuration options, please visit gofrp
(If I hadn't written this article, I wouldn't have known that INI was deprecated. I haven't figured out many of the new configurations myself, so I had to learn as I wrote this article)
arm/arm64 corresponds to ARM architecture (who uses Windows on ARM anyway?), amd64 corresponds to x86 architecture
If you can't access GitHub, you can use the 123Pan link provided by this site
1-2-2. Configuring the toml File
The following configuration file is just an example. You should make appropriate modifications based on your actual situation.
Refer to section 1-1 for configuration parameters
1-2-3. Configuring the Startup File
There are two methods here. One is to configure an xxx.bat file and place it in
C:\Users<user>\AppData\Roaming\Microsoft\Windows\Start Menu\Programs\Startup\
directory. This way, xxx.bat will automatically start after the user logs in. This method is simple and straightforward.
Another method is to directly use nssm.exe to configure frps as a system service. This method allows it to run in the background without needing to log into a user account.
I personally use the second method. To be thorough, I'll demonstrate both methods.
First method: Create an xxx.bat file in the frps directory and add the content below
Right-click to create a shortcut, then move the shortcut to the directory below
C:\Users<user>\AppData\Roaming\Microsoft\Windows\Start Menu\Programs\Startup\
If you need to update the frps.toml configuration file later, just close the cmd window and restart xxx.bat
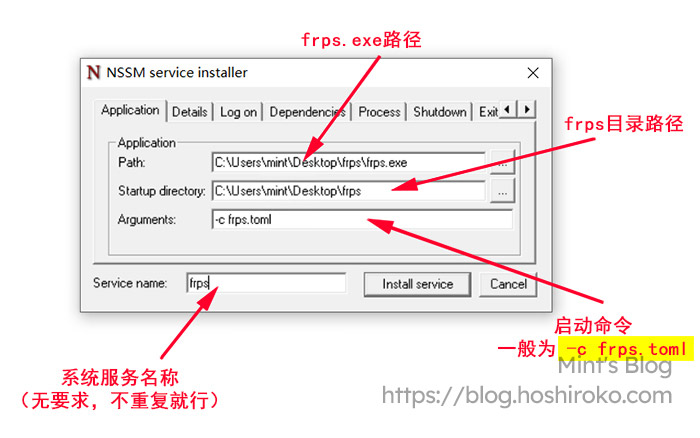
Second method: Go to the nssm official website to download nssm.exe. If domestic access is slow, you can use the 123Pan link provided by this site
After extracting, find nssm.exe in win64/32 and place it in a directory, then open cmd, cd to that directory, and run
After entering the command and pressing Enter, a window will pop up. Fill in according to the image below based on your actual situation, then click Install servicefrps-nssm
Afterward, go to Task Manager → Services, find the frpc service, right-click and start it. If you need to update the frps.toml configuration file later, find it here again and right-click to restart
1-3. Setting Up and Configuring frps on Linux
1-3-1. Preparing Resources
This step is the same as Windows, just select the Linux version
arm/arm64 corresponds to ARM architecture, amd64 corresponds to x86 architecture
If you can't access GitHub, you can use the 123Pan link provided by this site
You can also use wget directly, for example
If you can't download from GitHub in China, download the file locally and then manually transfer it to the corresponding directory
Regardless of which method you use to download, you'll eventually need to extract it to a directory
For example, if I want to extract to /usr/local/frps, then enter
At this point, our files are ready. Now let's start configuring and deploying!
1-3-2. Configuring frps.toml
First, let's install an editor. If you've already installed one, please skip this step
CentOS:
Ubuntu/Debian:
After installing the editor, cd to the /usr/local/frps directory and edit the TOML configuration file
Now we configure the frps.toml file
(The following configuration file is just an example. You should make appropriate modifications based on your actual situation)
Refer to section 1-1 for configuration parameters
After configuration, enter :wq to save
1-3-3. Setting Up the Startup Method
You can cd to /usr/local/frps and use ./frps -c frps.toml
Or you can directly use
If you want to set it to start on boot, please create a new system service for frps
Then add the following to frps.service:
After saving and exiting, enter the following to set frps to start on boot
At this point, frps should be running normally. If you're using a cloud server or have a firewall like BaoTa Panel, remember to open the ports
(Actually, there's another method for Linux which is to deploy using Docker, but I haven't figured that out yet)
1-4. Setting Up and Configuring frps on NAS Systems
Since I only have a Synology NAS on hand, I'll use the Synology system for demonstration
Other systems are actually quite similar, as they're all developed based on Linux. The only difference is that some NAS devices use ARM architecture and require a different frps version. However, tampering with system files without authorization can cause some serious consequences, so try not to do it! But if you can use Docker, it's basically the same for all systems
There are two methods to install:
One is using third-party packages (very simple), and the other is Docker (relatively complex)
Let's start with the first one
1-4-1. Installing Using Third-Party Packages
The official Synology Package Center doesn't include frps, so we need to add a third-party package source
Here we open Package Center → Settings (top right) → Package Sources → Add
We add the Kuangshen Source. The name can be anything
After adding, click OK. On the left, we can see a new Community section. Open it and find Frps Server, then install it
After installation, open it. Inside is the configuration file input page. Fill in the configuration file and save to run automatically. Configuration file example:
Refer to section 1-1 for configuration parameters
1-4-2. Installing Using Docker
Generally not recommended, because some NAS devices use ARM architecture and cannot use Docker. Please make sure your NAS can use Docker before installing
Open Container Manager. If you don't have it, install one from the official Synology Package Center
Click on Registry on the left, search for snowdreamtech/frps, and double-click to download the image
(The latest tag is fine. If you want to specify a version, enter 0.53.0, 0.52.1, etc.)
After installation, go to Containers and add a new container. Select snowdreamtech/frps for the image, enter any container name, and click Next
Now we go outside and manually create a frps.toml configuration file and fill in the configuration. Configuration file example:
Refer to section 1-1 for configuration parameters
After writing the configuration file, save it and copy it to the frps folder in the docker directory of the NAS shared folder
Example: /volume1/docker/frps
Now we return to the Container Manager interface
In the storage settings, select Add File and choose the frps.toml configuration file we just created
Example: /volume1/docker/frps/frps.toml
After coming out, we'll notice it also requires a path on the right side. This is the configuration file path inside our Docker container
We simply enter /etc/frp/frps.toml, then click Next all the way
At this point, we're done setting up. Remember to disable the router firewall or system firewall
2. Deployment and Configuration of frpc
2-1. Introduction to Common frpc Configuration Files
Since frp version 0.52.0, TOML, YAML, and JSON configuration files are supported, and INI configuration files have been deprecated. Support for INI will be removed in future versions. GitHub Announcement
Therefore, tutorials for versions before 0.52.0 on the internet may become obsolete in the future (if you're using an old version, just ignore this)
For stability and new features, all frps/frpc examples in this article will use TOML configuration files
frpc is a lightweight reverse proxy client that can achieve intranet penetration functionality. frpc needs to be used together with the frps server. frpc is deployed on the machine where the intranet service that needs to be penetrated is located, and frps needs to be deployed on a machine with a public IP.
Connect to server
Server authentication and password
(For OIDC authentication, refer to the gofrp documentation. We'll only cover the most commonly used token here)
Enable TLS encryption for client-to-server connection
Create TCP tunnel
Create UDP tunnel
Create HTTP/HTTPS tunnel
Transport encryption/compression (add inside the tunnel)
These tunnel types are the most commonly used. As for tcpmux, stcp, sudp, xtcp, I haven't figured them out myself yet
But tcpmux is a key feature. I'll add more about it when I have time
Now that we understand the common configurations, let's officially start deployment!
2-2. Deploying and Configuring frpc on Windows
Actually, this is pretty much the same as frps, just with different programs and configuration files
The deployment methods are exactly the same
arm/arm64 corresponds to ARM architecture (who uses Windows on ARM anyway?), amd64 corresponds to x86 architecture
If you can't access GitHub, you can use the 123Pan link provided by this site
2-2-2. Configuring the toml File
Example: (I want to map my Remote Desktop port so that I can access it from the external network)
Note! The following is just a demonstration example. You should write according to your own needs referring to section 2-1
2-2-3. Configuring the Startup File
There are two methods here. One is to configure an xxx.bat file and place it in
C:\Users<user>\AppData\Roaming\Microsoft\Windows\Start Menu\Programs\Startup\
directory. This way, xxx.bat will automatically start after the user logs in. This method is simple and straightforward.
Another method is to directly use nssm.exe to configure frpc as a system service. This method allows it to run in the background without needing to log into a user account.
I personally use the second method. To be thorough, I'll demonstrate both methods.
First method: Create an xxx.bat file in the frpc directory and add the content below
Right-click to create a shortcut, then move the shortcut to the directory below
C:\Users<user>\AppData\Roaming\Microsoft\Windows\Start Menu\Programs\Startup\
If you need to update the frpc.toml configuration file later, just close the cmd window and restart xxx.bat
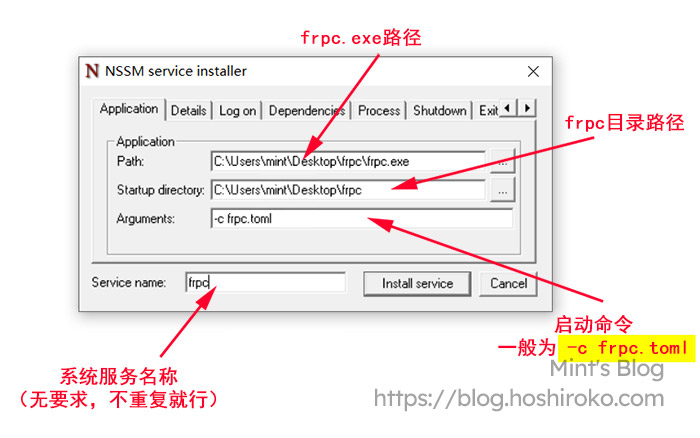
Second method: Go to the nssm official website to download nssm.exe. If domestic access is slow, you can use the 123Pan link provided by this site
After extracting, find nssm.exe in win64/32 and place it in a directory, then open cmd, cd to that directory, and run
After entering the command and pressing Enter, a window will pop up. Fill in according to the image below based on your actual situation, then click Install servicefrpc-nssm
Afterward, go to Task Manager → Services, find the frpc service, right-click and start it. If you need to update the frpc.toml configuration file later, find it here again and right-click to restart
2-3. Deploying and Configuring frpc on Linux
2-3-1. Preparing Resources
This step is the same as Windows, just select the Linux version
arm/arm64 corresponds to ARM architecture, amd64 corresponds to x86 architecture
If you can't access GitHub, you can use the 123Pan link provided by this site
You can also use wget directly, for example
If you can't download from GitHub in China, download the file locally and then manually transfer it to the corresponding directory
Regardless of which method you use to download, you'll eventually need to extract it to a directory
For example, if I want to extract to /usr/local/frpc, then enter
At this point, our files are ready. Now let's start configuring and deploying!
2-3-2. Configuring frpc.toml
First, let's install an editor. If you've already installed one, please skip this step
CentOS:
Ubuntu/Debian:
After installing the editor, cd to the /usr/local/frpc directory and edit the TOML configuration file
Now we configure the frpc.toml file
Example: (I want to map my SSH port so that I can access it from the external network)
Note! The following is just a demonstration example. You should write according to your own needs referring to section 2-1
After configuration, enter :wq to save
2-3-3. Setting Up the Startup Method
You can cd to /usr/local/frpc and use ./frpc -c frpc.toml
Or you can directly use
If you want to set it to start on boot, please create a new system service for frpc
Then add the following to frpc.service:
After saving and exiting, enter the following to set frpc to start on boot
At this point, frpc should be running normally
(Actually, there's another method for Linux which is to deploy using Docker, but I haven't figured that out yet)
2-4. Deploying and Configuring frpc on NAS Systems
Since I only have a Synology NAS on hand, I'll use the Synology system for demonstration
Other systems are actually quite similar, as they're all developed based on Linux. The only difference is that some NAS devices use ARM architecture and require a different frpc version. However, tampering with system files without authorization can cause some serious consequences, so try not to do it! But if you can use Docker, it's basically the same for all systems
There are two methods to install:
One is using third-party packages (very simple), and the other is Docker (relatively complex)
Let's start with the first one
2-4-1. Installing Using Third-Party Packages
The official Synology Package Center doesn't include frpc, so we need to add a third-party package source
Here we open Package Center → Settings (top right) → Package Sources → Add
We add the Kuangshen Source. The name can be anything
After adding, click OK. On the left, we can see a new Community section. Open it and find Frpc Client, then install it
After installation, open it. Inside is the configuration file input page. Fill in the configuration file and save to run automatically.
Configuration file example: (I want to map my DSM port so that I can access it from the external network)
Note! The following is just a demonstration example. You should write according to your own needs referring to section 2-1
2-4-2. Installing Using Docker
Generally not recommended, because some NAS devices use ARM architecture and cannot use Docker. Please make sure your NAS can use Docker before installing
Open Container Manager. If you don't have it, install one from the official Synology Package Center
Click on Registry on the left, search for snowdreamtech/frpc, and double-click to download the image
(The latest tag is fine. If you want to specify a version, enter 0.53.0, 0.52.1, etc.)
After installation, go to Containers and add a new container. Select snowdreamtech/frpc for the image, enter any container name, and click Next
Now we go outside and manually create a frpc.toml configuration file and fill in the configuration.
Configuration file example: (I want to map my DSM port so that I can access it from the external network)
Note! The following is just a demonstration example. You should write according to your own needs referring to section 2-1
After writing the configuration file, save it and copy it to the frps folder in the docker directory of the NAS shared folder
Example: /volume1/docker/frpc
Now we return to the Container Manager interface
In the storage settings, select Add File and choose the frpc.toml configuration file we just created
Example: /volume1/docker/frpc/frpc.toml
After coming out, we'll notice it also requires a path on the right side. This is the configuration file path inside our Docker container
We simply enter /etc/frp/frpc.toml
Click Next all the way
At this point, we're done deploying. You can try accessing it
(Writing frpc was really easy, because most of it was copied from frps)
(Can't help it, deploying them is really exactly the same, just swap the program and configuration file)
3. Using Public frp Services
Public frp, as the name suggests, is frp that is open to the public. Some are free to use, and some are paid
So why use public frp?
No money
No ability
Too much hassle
Too lazy to maintain
Yes, even though what I've taught above is already very thorough and clear, maintaining an frp server is still time-consuming, labor-intensive, and expensive
Let me give an example. Say I want to play Minecraft with 5 friends. If I don't want to play on official servers and want to add 50 mods myself, according to Bing AI and Bard, each player should have 1.5-2Mbps bandwidth for a good gaming experience. So based on the cost of self-building frp, I would need at least an 8-10Mbps server to ensure smooth gameplay. At major cloud providers, Alibaba Cloud and Huawei Cloud cost 255-350 yuan per month, and Tencent Cloud costs 130-150 yuan per month
(This is just for lightweight applications, with monthly traffic limited to 1200-2000G)
Some people say, overseas machines have cheaper bandwidth
Uh... you're going to use an overseas machine for gaming? If you buy a US machine, wouldn't the traffic have to go around the world twice?
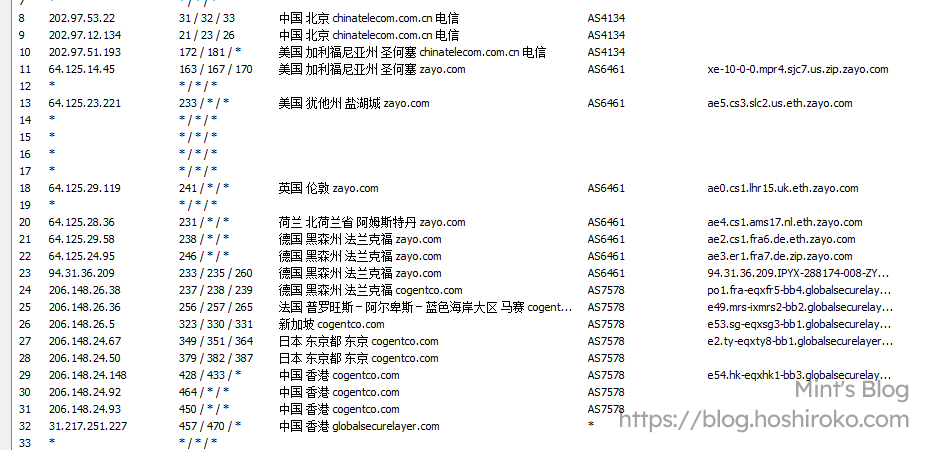
And if your machine's route isn't something like CN2, 9929, or CMI...... uh
P.S. This is a Hong Kong server
Others say, smaller providers have cheaper machines
That's true. Some smaller providers' machines are indeed 20% of the major providers' prices, but that's still 40-90 yuan per month, and there's also the risk of them going out of business
So, purchasing a server is already a hassle in itself. Some people just want to play a game, but end up buying a bunch of servers (like me)
Sometimes we really should calm down and think about what we actually need
This is why people use public frp
I won't recommend specific public frp services here to avoid being accused of advertising
Public frp services usually have their own documentation, so I won't go into detail here
They're all pretty much the same anyway. Once you understand self-building, you'll basically get the gist of it